Learn to Play The Guitar mini-course Lesson 4

Remember in the lesson 2 we talked about warming up and using the correct fingering. Before you start this lesson, just try another one of these warm up fingering drills.
This following warm up exercise involves the 6th, 5th and 4th strings (three thickest strings). Once again I would like you to use correct fingering when you are playing this. Remember, your index finger is number 1, you middle finger is number 2, your ring finger is number 3 and your pinky is number 4. Play in down strokes and take your time. Try and make each note ring clear. Remember it is better to play slowly and accurately than to sound muddy and unclear.

Video Available:
| QuickTime - Exercise 1 (2.47 MB) |
Now that you have finished that warm up pattern it's time to move onto the main part of the lesson which is some work on the next 'tool' you're going to need.
Tool: Pull off
What is a pull off? Answer: A pull off is the reverse of a hammer on. Where a hammer on plays up the fret board, a pull off plays down. An example is fretting your finger on the 7th fret while anchoring another finger below (5th fret) on the same string. Pick the string once and pull off the original fretted finger (7th fret) down towards the floor, leaving the 5th fretted finger on the fretboard. This should create two even sounds. As with the hammer on, you only pick the string once. With a pull off, the pitch will always go down (descend).
Why use pull offs?
Pull offs have the same purpose as hammer ons. They will help you play a passage faster and give you a smoother sound. Combining these tools, the pull off and hammer will begin to advance the sound and skill level of your playing.

Video Available:
| QuickTime - Exercise 2 (589 KB) |
Pull offs are generally used to descend through a solo or lead line. This means that the notes go down in pitch. The opposite generally happens with hammer ons. Hammer ons usually ascend, going upwards in pitch.
Here's another exercise for you to look at with hammer on's and pull offs together. This is a tricky one. Give yourself time, your fingers will start to learn how it feels as you play the exercise over.
Video Available:
| QuickTime - Exercise 3 (695 KB) |
Well done on that last exercise. Things are getting pretty tricky now so keep up the good work, you're learning some of the skills that the best use to really wail.
Section two: House of the Rising Sun
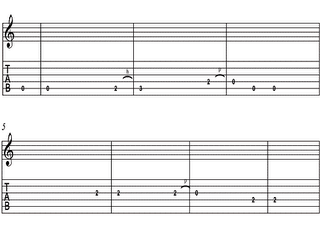
Now we're going to look at the second part of "House of the Rising Sun". Once again, take your time to go through it and make sure you get every note sounding clean. Don't worry if you find it difficult as that is normal. Some of these skills will take time to master.
The next step for us is putting both the sections together with hammer ons and pull offs.
House of the Rising Sun. Part one and two
Well done on that last exercise. This is really starting to look like a song. You'll be playing "House of the Rising Sun".
Now you have three different 'tools' at your disposal; 'single note playing', 'hammer on' and 'pull off'. That's great! In the next lesson we're going to use the tools you've learnt and the 'C Shape' pattern of notes to play "House of the Rising Sun". You're almost there and well on your way to becoming a complete lead guitar player.
If you have been completing the lessons in full then you are doing well and I think you are committed to becoming a good guitarist. Keep going! There are only two more lessons to go before you can play the whole song with the Jamorama Band.
Until next time!For full Course please Visit Jamorama.com


Comments