Learn to Play The Acoustic Guitar Mini-course #4
Welcome to Part Four of the Beginners Mini-Course on Learning How to Play the Acoustic Guitar.
In today's lesson we have a lot to cover. We will be playing all of the chords that you have learned: C, A minor and D, and we will be trying a new time signature with these chords. Don't worry too much about what this means it will be explained. By now you should be able to play and change between these three chords. If you followed the lessons carefully you should find these exercises a logical and easy progression from what you have previously done. It's great to have you with us...
Today's lesson is based around trying to play a specific rhythmical strum on the guitar. The first three lessons have challenged your fretting hand. This lesson is going to challenge your strumming hand. It's a bit different to what you have already learnt but if you are patient you will pick it up in no time. Being able to play particular strums and rhythms is an important and often under practised part of playing the guitar. Many musicians get caught up in learning crazy chords or playing speedy scales. This can often lead to the neglect of rhythm which is the basis for all music.
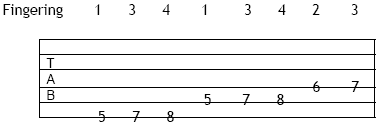
Remember in the last lesson we talked about warming up and using the correct fingering. Before you start this lesson, just try another one of these warm up fingering drills.
This following warm up exercise involves the 6th, 5th and 4th strings (three thickest strings). Once again I would like you to use correct fingering when you are playing this. Remember your index finger is number 1, you middle finger is number 2, your ring finger is number 3 and your pinky is number 4. Play in down strokes and take your time. Try and make each note ring clear. Remember it is better to play slowly and accurately than to sound muddy and unclear.
Now that you have finished that warm up pattern it's time to move onto the main part of the lesson which is some work on strumming. Before you start on this I am going to explain some simple music theory to you. Don’t get intimidated by this as it is pretty simple.
You may or may not have noticed that most of the things you have played previously have been in groups of fours or numbers that are divisible by four. Most music is like this and if you don’t believe me turn on your radio. Try and count out in fours while listening to the playing. I am confident that you will be able to count out in fours to most pieces of music you will hear.
So previously when you were strumming up and down you were playing HALF beats. That is why I had you count out, "one AND two AND three AND four AND", to split each beat in half and strum in eights. What we are going to do now is instead of working in groups of four, we're going to work in groups of three. So now you will count "one AND two AND three AND". This splits the everything into three. It's actually very simple.
In this next exercise we will play just A minor for two bars. This time playing in groups of three. Keeping the same style of strum. So you strum down and up and count aloud "one AND two AND three AND"
What you've actually been doing is playing in 3/4. This is a called a time signature. It's called 3/4 (three four) because you count "one, two, three". In the previous lessons you've been playing in 4/4 (four four) becuase you count "one two three four".
Ok, let's push those boundries a little...
Exercise:
Basically, what I want you to do is skip one of the strums in the 3/4 strum pattern. In terms of what you have been counting I want you to skip the AND of the first beat when you are strumming. So what I want you count now is "one two AND three AND". Watch the video to see what you need to strum or give it a go and see what I mean...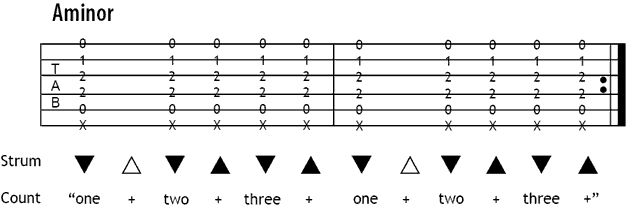
Now it's time to learn a new chord. This new chord is called E:


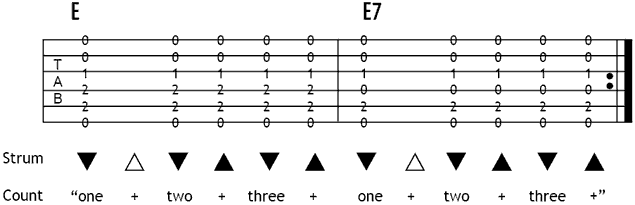
Now we're going to do a quick exercise with the chords we've learnt so far using the 3/4 strum pattern you've been practicing. Things are getting quite tricky now so pay attention to the video and be sure that you are getting the changes between each chord. These exercise is the hardest and longest you've done so far so keep up the good work, its not easy stuff. This is a neat little progression and you will hear how nice it sounds.
Remember that if you're having troubles listen closely to the audio tracks and watch the video. These are invaluable tools in helping you with these exercises.

Now you have six different chords at your disposal, C, D, A minor, E, E7 and now F. That's great! These are all the chords you will find in "House of the Risin Sun". So now all we've got to learn is the structure of the song. You're almost there. You're well on your way to becoming a complete guitar player
Next lesson we'll look at the chords that go together and the first part of the song.
If you have been completing the lessons in full then you are doing well and I think you are committed to becoming a good guitarist. Keep going! There are only two more lessons to go before you can play the whole song with the Jamorama Band.
Until next time!
Comments