Learn to Play The Acoustic Guitar Mini-course #3

Welcome to Part Three of the Beginners Mini-Course on Learning How to Play the Acoustic Guitar. This mini-course gives you a taste of what's covered in The Jamorama Acoustic Guitar Learning Kit! In this course you will learn powerful tips and skills to get you playing the acoustic guitar with the fluency and accuracy of a professional, and by the end of it you will be able to play a full song by yourself
This lesson continues on from lessons one and two. In lesson one you learnt how to start playing and how to play the chords C and D. In the second lesson you were shown how to read tab. This lesson will be similar to the second part of lesson two, however I plan to introduce you to the chord A minor. Once you have mastered A minor, we will try and practice changing between the three chords we have learnt; C, A minor, and D.
So far, the chords that you have learnt have all been major chords. Major chords give music a happy feel. Minor chords, on the other hand, lend a sad or melancholy feeling to music. Minor chords are constructed in the same way as major chords except that the third or middle note of the chord is flattened (something that is explained in full later in the jamorama book).
Let's take a look at the A minor chord: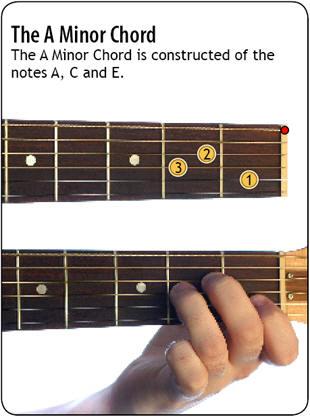
Video Available:
| QuickTime - Exercise 1 (2.14 MB) WindowsMediaPlayer - Exercise 1 (2.5 MB) |
Exercise:
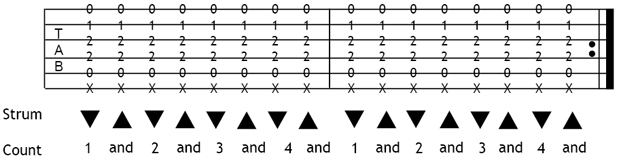
With this exercise, I want to get you strumming up and down. I would like to introduce to you a new technique to help with your playing. When you are practicing the lesson above I would like you to count out loud. This sounds easier than it is, but it is something you need to learn and it is an achievable skill. It works like this; on your down strum I want you to count “1,2,3,4,1,2,3,4” and on the up strum I would like you to say “and”. So you should be saying “1 and 2 and 3 and 4 and 1 and 2 and 3 and 4”. Most guitar music is broken down into beats of four but later on in the course we'll look at something a bit different. Try the exercise below and remember to take a look at the video if you have any problems:
A minor chord
Tip: You can download a video example of the above exercise to see and hear it for yourself. The download links are below (right click on the link and select "save as"):
QuickTime - Exercise 2 (2.30 MB)
WindowsMediaPlayer - Exercise 2 (2.80 MB)
As you can see the difference between practicing this chord and the previous chords you have learned is that you are doubling up on the strum. The way I would like you to do this is by strumming up when you bring your hand back up. Take your time with this. Watch the video provided and try and play along. Your strum should be constant and in time. The track provided is slow and with a little pratice you should be able to play A minor with up and down strum.
Now we are going to work on changing between A minor, C and D. As above, I would like you to continue using an up and down strum and counting out loud. So if you continue with your, “1 and 2 and 3 and 4 and”, it will help make the next lesson a lot easier.
Exercise:
Next I want you to practice going from A minor to C. This should feel like a realitively smooth and easy chord change. It also sounds good and should with a bit of practice feel very natural. Just to remind you, you should be strumming up AND down while you perform this exercise and counting out aloud, "one and two and three and four and", in time with your strum. Note that each 'and' is written as '+' in the following exercise... This is just so that it fits properly under the TAB.
Tip: You can download a video example of the above exercise to see and hear it for yourself. The download links are below (right click on the link and select "save as"):
Video Available:
| QuickTime - Exercise 3 (2.33 MB) WindowsMediaPlayer - Exercise 3 (2.88 MB) |
Adding the up and down strum may mean that this will take a little longer to master than the previous chord changing exercises in lesson 2. Don't worry though, just keep working away at it until you can play along comfortably with the audio track provided.
Now we will move onto the next exercise. This one starts on C and then goes to D. Once again I would like you continue with the up and down strum and the counting aloud as in the previous exercises in this lesson.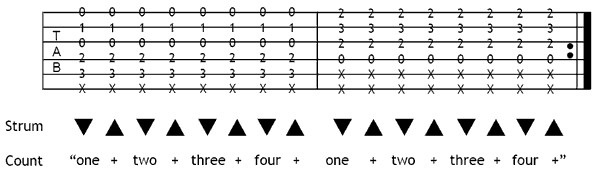
Video Available:
QuickTime - Exercise 4 (2.33 MB)WindowsMediaPlayer - Exercise 4 (2.87 MB)
You're doing great here! Just as a quick note, when you play a group of chords in order it is called a ‘progression’ or a ‘chord progression’.
By now you will have come across some of the difficulties and pain that come with learning the guitar. For most of you, just pressing down the strings and trying to play chords will have caused some moderate pain. Most of this pain will be in your fretting hand ( left hand for right handed players). This pain is normally felt in a few places; pain in your fingertips, sore wrists, stiff forearms and pain between your thumb and your fingers. Most of this pain is inevitable and will pass with time.
If you have serious continued pain in your hands then you should contact a health care professional. Repetitive Strain Injuries (R.S.I) and carpal tunnel syndrome are the most common serious problems that guitarists encounter. However for the vast majority of players these problems are not an issue.
The best way to avoid pain when you are playing the guitar is to dedicate some time to warming up. There are many ways you can warm up and every guitar player has a different method. In this lesson I will show you some basic warm up techniques. These techniques will also help you build hand strength and a little bit of speed.
Unlike the previous exercises in this lesson there is no need to continue with the up and down strokes. All the strokes in these two exercises will be single notes using down strokes. It is important to note that in these warm up exercises you will be playing single notes as opposed to chords which you have been practising in this lesson and in lessons 1 and 2.
In this first warm up exercise I want you to get used to using particular fingers. If you look at the diagram below you will see that each finger is numbered. Your index finger is 1, your middle finger is 2, your ring finger is 3 and your pinky is 4.
This following exercise is excellent for warming up, improving hand strength and increasing
co-ordination. You will notice that I have tabbed out some single notes for you to play. Above the TAB I have written some numbers. These numbers indicate the fingers I would like you to use when doing the exercise.
Video Available:
| QuickTime - Exercise 5 (2.50 MB) WindowsMediaPlayer - Exercise 5 (3.05 MB) |
As you can see, this is just a simple ascending and descending pattern on the 1st string (thinnest string). First, you use your index finger, then your middle finger, then your ring finger and finally your pinky. The second part is just the same thing but in reverse.
This second exercise I want to show you involves three strings; the 1st, 2nd and 3rd. It is important to notice the fingering used. This may feel a little awkward and frustrating at first but this is the correct way to play the guitar. Getting in the habit of using correct fingering will pay massive dividends as you progress with your guitar playing. This time you will notice that this exercise is played using a combination of UP and DOWN strokes...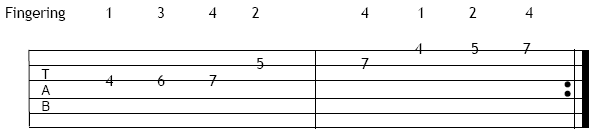
Video Available:
| QuickTime - Exercise 6 (2.90 MB) WindowsMediaPlayer - Exercise 6 (3.52 MB) |
In tomorrows lesson we have a lot to cover. We will be playing all of the chords that you have learned; C, D and A minor, and you will be introduced to the strumming you will need to play the song 'House of the Risin Sun'. If you followed the lessons carefully you should find these exercises a logical and easy progression from what you have previously done. It's great to have you with us.
Until next time!Jamorama.com


Comments