Learn to Play The Guitar mini-course Lesson 2

Warm Ups
By now you will have come across some of the difficulties and pain that come with learning the guitar. For most of you, just pressing down the strings and trying to play chords will have caused some moderate pain. Most of this pain will be in your fretting hand ( left hand for right handed players). This pain is normally felt in a few places; pain in your fingertips, sore wrists, stiff forearms and pain between your thumb and your fingers. Most of this pain is inevitable and will pass with time.
If you have serious continued pain in your hands then you should contact a health care professional. Repetitive Strain Injuries (R.S.I) and carpal tunnel syndrome are the most common serious problems that guitarists encounter. However for the vast majority of players these problems are not an issue.
The best way to avoid pain when you are playing the guitar is to dedicate some time to warming up. There are many ways you can warm up and every guitar player has a different method. In this lesson I will show you some basic warm up techniques. These techniques will also help you build hand strength and a little bit of speed.
In this first warm up exercise I want you to get used to using particular fingers. If you look at the diagram below you will see that each finger is numbered. Your index finger is 1, your middle finger is 2, your ring finger is 3 and your pinky is 4.
This following exercise is excellent for warming up, improving hand strength and increasing
co-ordination. You will notice that I have tabbed out some single notes for you to play. Above the TAB I have written some numbers. These numbers indicate the fingers I would like you to use when doing the exercise.
Before we move on, I would like to introduce to you a musical symbol that we will be using from now on:
The symbol on the right is called a repeat sign. When you see this symbol, you go back to the start of the piece of music you are playing and play it over again.
Video Available:
| QuickTime - Exercise 1 (2.45 MB) |
As you can see, this is just a simple ascending a
nd descending pattern on the 1st string (thinnest string). First, you use your index finger, then your middle finger, then your ring finger and finally your pinky. The second part is just the same thing but in reverse.
This second exercise I want to show you involves three strings; the 1st, 2nd and 3rd. It is important to notice the fingering used. This may feel a little awkward and frustrating at first but this is the correct way to play the guitar. Getting in the habit of using correct fingering will pay massive dividends as you progress with your guitar playing. Once again, play this exercise with
down strokes only...
Video Available:
| QuickTime - Exercise 2 (1.04 MB) |
Now, let's get on with the lesson...
'C' Pattern and Scales - Boring right? Na-ah!
It's time to look at some theory. Don't get scared, this is going unlock some amazing secrets to playing lead guitar.
This mini course is based on a vital pattern which we will have you master - the 'C' Shape pattern. By mastering this pattern you will be able to play all of the notes you need to play the song, 'House of the rising sun'. To understand this pattern it's important to practice it and refer back to it often. In the full Jamorama lead course you wi ll learn more patterns and how to play the whole guitar fret board giving you access to all the notes you'll ever need!
OK, to teach you about the 'C' pattern we need to take a look at scales. Have you ever seen your favorite band or guitarist improvise a solo that sounded note for note perfect and left the crowd in awe and then think how on earth did he do that? The answer? Talent? Sure talent is part of it, but a more important aspect is scale knowledge. You see, weather it’s Jimi Hendrix, Kirk Hammet or Stevie Ray Vaughan, they all knew which notes harmonized well over thier chords to make it the solo wail.
Stop! Aren’t scales like boring Do, Re, Mi, Fa, sol that we learnt in school? Well, yes they are but what if I told you that they’re also the Stairway to He
aven solo, Van Helen’s Eruption or the famous solo in Hotel California? You might see them in a new light.
In learning scales you increase your chances tenfold of playing a lead guitar solo or melody that will sound awesome. So what exactly is a scale:
• A scale consists of 7 different notes with the 8th note being the octave higher.
• Scales are built up of half steps and whole steps between notes and this determines what type of scale it is.
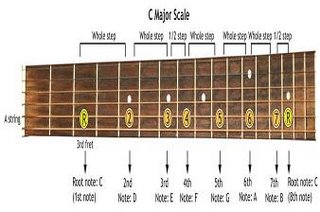
What does this mean? The diagram below of a major scale in the key of ‘C’ helps explain it.
• The “Root” or “Tonic” decides what the rest of the notes in the scale are going to be. In the above example we see the root is ‘C’ and the rest of the notes in the ‘C’ major scales are D,E,F,G,A,B.
• All major scales follow a pattern of whole step, whole step, half step, whole step, whole step, whole step, half step. Major scales are going to be the main focus of this course for this is what has created the majority of popular music. '
This stuff is important to learn as we are going to use it when learning the patterns in the song 'House of the rising sun'.
The 'C Shape'
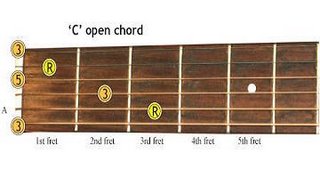
Finding the 'C Shape'. It's called the 'C shape'because it is based around the open C chord.
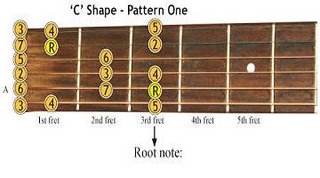
Here you will see we have a simple C major chord. You can see the chord and its relative notes in the scale on the fret board. All major chords are made up of the root the 3rd and 5th note of the major scale (not always in that order). When you highlight the root note, 3rd and 5th in pattern one, it outlines an open ‘C’ major chord. The diagram below emphasizes this point.
The C Major chord is made up of root notes, 3rds and 5ths. As you can see in the diagram:
The 'C Shape' (or pattern) takes its name from the open C chord. If you look closely you can see the C major chord in the pattern. That's why we call this pattern the 'C shape', because using the C major chord is a good reference point to learning the pattern and its notes.
You can see the C major chord by looking at the root notes: "R", the 3rds: "3", and the 5ths: "5".
This is important because its from these notes that we will learn how to play the song and use lead playing "tools".
Here's the 'C Shape' again but this time underneath you will notice the notes written out in TAB form so you can see how the shape works.

Introducing Picking
There are two methods of picking the guitar string. These are up stroke and down stroke. Throughout this mini course these strokes will be notated as follows:

When you play a stroke, you pick across the strings just in front of the bridge of the guitar with the pick in your strumming hand. When strumming a chord, make sure that you play all of the necessary strings in the chord. The stroke direction will depend on which stroke is indicated; up or down as shown above.
Now try playing the scale again but this time descending.
Video Available:
| QuickTime - Exercise 3 (744 KB) |
It's important to become familiar with the notes in this scale because its these notes we're going to use to play the song.
This has been a big lesson for you. Go over it if you need to, some of the ideas are quite complicated to get straight away but remember to be patient with your learning.
Don't forget, for the Jamorama Lead Guitar Learning Kit which includes step-by-step written lessons, video lessons, audio lessons and sophisticated software games to accelerate your guitar learning. Visit Jamoramalead.com to find out more.


Comments